2D animation has become one of the most effective ways for brands, educators, game developers, and businesses to communicate ideas through engaging visuals. From animated characters and explainer videos to game assets and promotional content, 2D animation can turn a simple concept into an experience that captures attention.
One of the many techniques used in 2D animation workflows is image opacity. While opacity may seem like a small visual adjustment, it can play an important role in creating transitions, visual effects, character references, and layered animation sequences. When combined with a well-organized character rig, keyframes, and a timeline-based workflow, opacity can help animators create compelling results without relying on complicated production methods.
In this guide, we will explore how to create a quick 2D animation demo using image opacity. We will also look at character preparation, bone rigging, image assets, keyframes, animation timing, and export considerations.
Whether you are experimenting with 2D animation for the first time or looking for ways to improve your production workflow, this tutorial provides a practical overview of the process.
What Is Image Opacity in 2D Animation?
Before creating an animation, it is important to understand what opacity means.
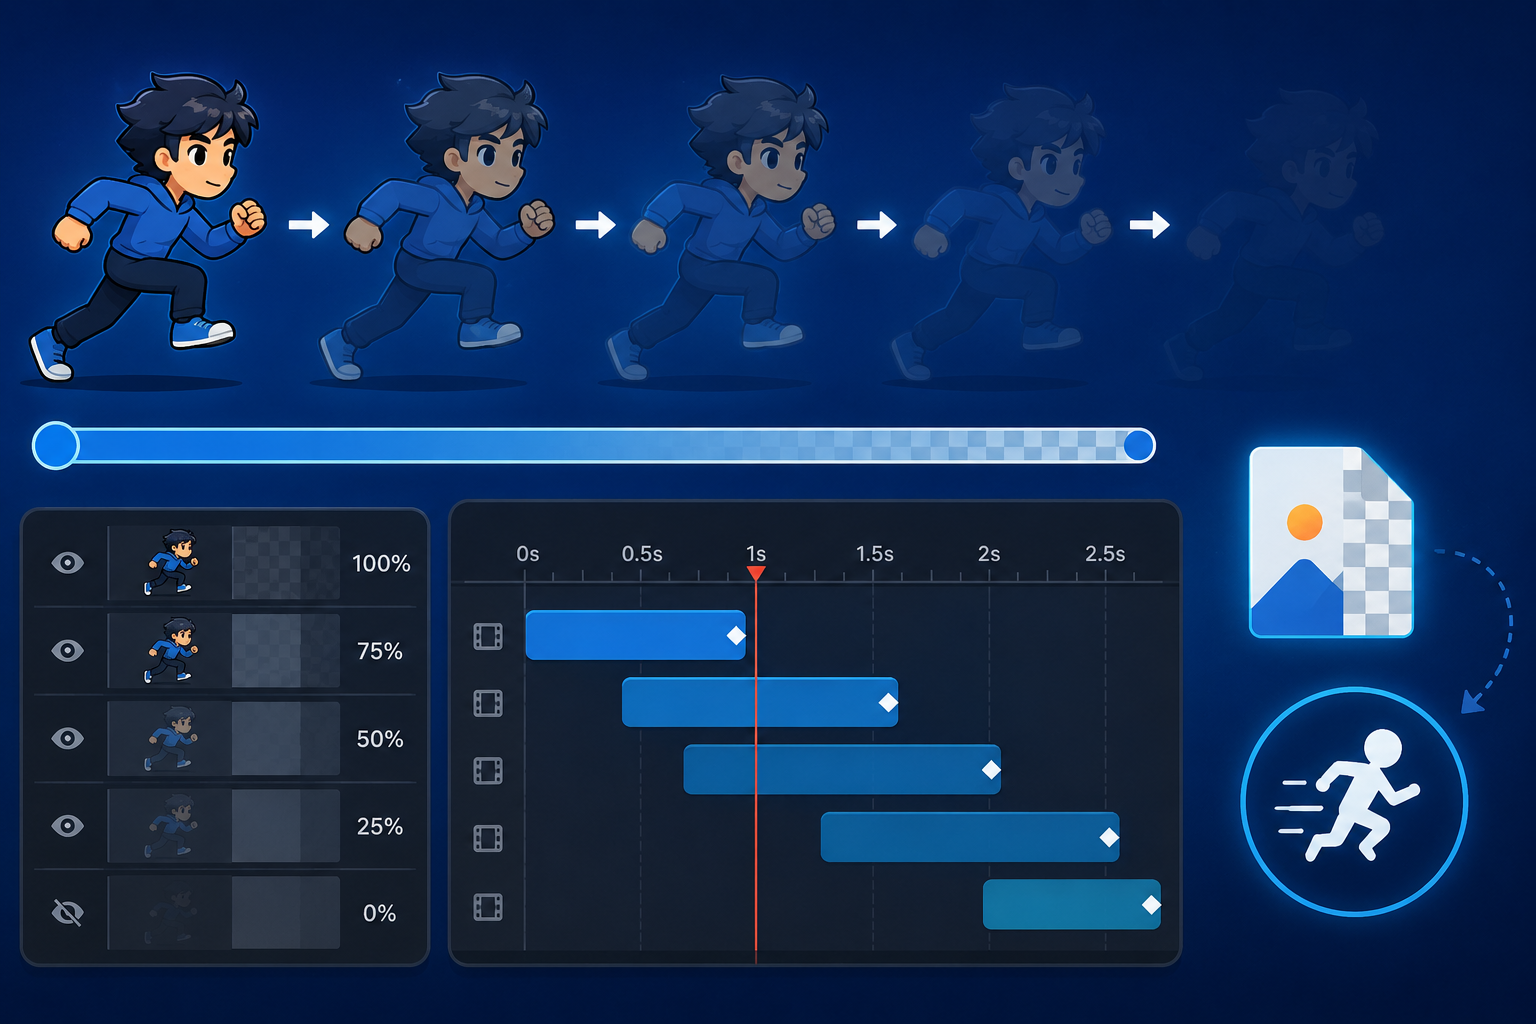
Image opacity refers to how transparent or visible an image appears. An image with 100% opacity is completely visible, while an image with lower opacity becomes increasingly transparent. At 0% opacity, the image is fully invisible.
Opacity is closely related to transparency, but the two terms can be used slightly differently depending on the software and workflow. In animation, opacity is often controlled over time to create visual changes between different states.
For example, imagine a character standing on screen. If the character begins at 0% opacity and gradually increases to 100%, the result is a simple fade-in animation. The opposite process creates a fade-out effect.
Opacity can also be used to:
- Create smooth fade transitions
- Reveal or hide visual elements
- Blend multiple layers
- Create ghost or shadow effects
- Show animation references
- Control background elements
- Build visual storytelling effects
- Transition between scenes
- Add depth to a composition
For 2D animation projects, image opacity can be especially useful when working with layered PNG assets. PNG files are widely used in animation because they can support transparent backgrounds, allowing individual character parts and visual elements to be placed together without unwanted backgrounds.
Why Use PNG Images for 2D Animation?
When creating a 2D character animation, you may work with multiple separate image assets. A character’s head, arms, hands, legs, clothing, accessories, and facial elements can all be prepared as individual assets.
PNG images are often a practical choice because they support transparency. This makes it possible to place one asset over another while maintaining the correct visual composition.
For example, a character could be separated into:
- Head
- Hair
- Body
- Upper arms
- Lower arms
- Hands
- Upper legs
- Lower legs
- Feet
- Clothing
- Accessories
Each element can be imported separately and positioned within the animation workspace.
This approach provides greater control over movement. Instead of animating a complete character image as one object, the animator can move individual body parts independently.
The result is a more flexible animation workflow.
Step 1: Prepare Your Character Assets
The first step in creating a quick 2D animation is preparing your artwork.
Your character should ideally be divided into separate components before importing it into your animation software. This makes it easier to create a rig and control individual movements.
For example, if you want your character to wave, the arm should be separated from the body. If the character is going to walk, the legs should be available as individual components.
Before importing your assets, make sure:
- Each image is properly cropped
- Transparent backgrounds are used where necessary
- The resolution is appropriate for the final output
- Individual body parts are separated logically
- The character design is consistent across all assets
- File names are organized and easy to identify
Good asset organization can save significant time during production.
Instead of naming files randomly, consider using descriptive names such as character_head, character_body, left_arm, or right_leg. A structured naming system makes larger projects easier to manage.
Step 2: Import Your Character Into the Workspace
Once your assets are ready, import them into your 2D animation workspace.
Depending on the software you use, you may be able to drag and drop assets directly into the scene. Arrange each component according to the character’s original design.
At this stage, you may notice that the character looks like a collection of separate images rather than a complete figure. This is completely normal.
The goal is to rebuild the character inside the animation environment.
Pay close attention to the positioning of each body part. The connection between the shoulder and arm, for example, should be aligned correctly. The same applies to elbows, wrists, hips, knees, and ankles.
Proper positioning at this stage will make the rigging process much easier.
Step 3: Adjust Image Opacity
After importing your character, you can experiment with the opacity settings.
Most animation software provides an image or layer properties panel where you can control transparency.
For a simple demonstration, you might reduce the opacity of an image to approximately 50%. This creates a semi-transparent version of the artwork.
The exact value depends on your purpose.
For example:
- 100% opacity: Fully visible
- 75% opacity: Slightly transparent
- 50% opacity: Semi-transparent
- 25% opacity: Highly transparent
- 0% opacity: Completely invisible
A reduced opacity setting can be helpful when using an image as a reference. It allows you to see other elements underneath or align assets more accurately.
In animation, opacity becomes even more interesting when it is animated over time. By placing different opacity values at different points on the timeline, you can create a fade effect.
For instance, you could set:
Frame 1: 0% opacity
Frame 15: 50% opacity
Frame 30: 100% opacity
The software can then interpolate between these values, producing a gradual fade-in.
This is a simple technique, but it can create polished results when used strategically.
Step 4: Build a Bone Structure
Once your character assets are positioned correctly, the next step is to create a skeleton or bone structure.
A 2D bone rig allows you to control different parts of a character more naturally.
Start by creating a main or root bone. This can be connected to the character’s torso or central body area. From there, create additional bones for the major body parts.
A basic character rig might include:
- Root bone
- Spine bone
- Neck bone
- Head bone
- Upper arm bones
- Forearm bones
- Hand bones
- Thigh bones
- Lower leg bones
- Foot bones
The exact structure depends on the character and the movements you want to create.
For a simple animation, you may not need a highly detailed rig. However, a well-planned skeleton gives you more control and makes future animation work easier.
Step 5: Establish Parent and Child Relationships
Creating bones is only part of the rigging process.
You also need to establish relationships between them.
This is commonly known as a parent-child hierarchy.
For example, the upper arm can be the parent of the forearm, while the forearm becomes the parent of the hand.
This means that when the upper arm moves, the connected parts can follow naturally.
A similar hierarchy can be created for the legs.
For example:
Hip → Thigh → Lower Leg → Foot
This structure makes character animation more intuitive.
If you rotate the thigh, the lower leg and foot can follow the movement. This saves time because you do not have to manually reposition every individual image.
A strong hierarchy is particularly important when creating walking, running, jumping, or dancing animations.
Step 6: Link the Bones to Your Images
After creating the skeleton, the next step is rigging the character.
Rigging connects the bones to the visual elements they are intended to control.
For example, the arm bone should control the arm artwork, while the leg bones should control the corresponding leg images.
The goal is to make the character behave as a unified animated figure.
When rigging is done correctly, moving a bone should result in the appropriate movement of the connected image asset.
This is one of the biggest advantages of using a rig-based 2D animation workflow. Instead of manually moving every image frame by frame, animators can manipulate a structured character system.
The more complex the character, the more valuable an organized rig becomes.
Step 7: Add Keyframes to the Timeline
Once your character has been rigged, you are ready to animate.
Most 2D animation software uses a timeline where you can place keyframes.
A keyframe represents an important position or state in the animation.
For example, if you want your character to raise its hand, you might create:
Keyframe 1: Arm resting beside the body
Keyframe 2: Arm moving upward
Keyframe 3: Arm fully raised
The software can generate the movement between these keyframes, creating a smoother animation.
You can also animate opacity.
For example:
Frame 1: Character opacity at 0%
Frame 20: Character opacity at 100%
The character will gradually appear on screen.
You could combine this effect with movement. Imagine a character fading into view while simultaneously walking forward. The result can feel much more dynamic than simply appearing instantly.
Step 8: Experiment With Opacity-Based Animation
Now that your character is rigged and keyframes are available, you can experiment with opacity.
One simple exercise is to create a fade-in effect.
Begin with the character at low or zero opacity. Add a keyframe at the beginning of the timeline. Move forward several frames and increase the opacity.
You can then preview the animation.
For a more advanced effect, try combining opacity with movement.
For example:
- The character starts at 0% opacity.
- The character begins moving forward.
- Opacity gradually increases.
- The character reaches 100% opacity.
- The character stops at the final position.
This technique can be used in intros, promotional videos, explainer animations, and interactive experiences.
You can also animate multiple elements independently.
Imagine a scene where the background appears first, followed by the character, and then individual visual effects. By controlling the opacity of each layer, you can create a sequence that guides the viewer’s attention.
Step 9: Focus on Timing and Easing
Animation is not only about movement. Timing plays a major role in how an animation feels.
A movement that happens too quickly may feel unnatural. A movement that is too slow may become boring.
When creating a quick 2D animation demo, experiment with the spacing between keyframes.
You can also use easing to make transitions feel more natural.
For example, a character’s arm might begin moving slowly, accelerate, and then slow down before reaching its final position.
Opacity can also benefit from easing.
Instead of making an image appear at a constant rate, you can create a smoother transition where the image fades in slowly at first and then becomes fully visible.
Small adjustments to timing can make a significant difference in the final quality of your animation.
Step 10: Preview and Refine Your Animation
After completing your first animation pass, preview the entire sequence.
Look for areas that feel unnatural or disconnected.
Ask yourself:
- Does the character move smoothly?
- Are the body parts aligned correctly?
- Does the rig behave as expected?
- Is the opacity transition too fast?
- Does the animation have a clear beginning and ending?
- Are the keyframes placed correctly?
- Does the timing match the intended message?
It is normal to make several revisions before reaching the desired result.
Professional animation is often an iterative process. Animators continuously review, refine, and polish their work until the movement feels natural and the visual storytelling is clear.
From a Quick Demo to Professional 2D Animation
A simple opacity experiment may only take a few minutes, but the same principles can be applied to much larger animation projects.
Professional 2D animation can involve much more than moving images across a screen. Depending on the project’s requirements, production may include:
- Concept development
- Character design
- Storyboarding
- Scriptwriting
- Illustration
- Character rigging
- 2D motion design
- Frame-by-frame animation
- Visual effects
- Sound design
- Voiceover
- Music
- Post-production
For businesses, animation can be used to explain complex products, introduce services, promote brands, educate audiences, and communicate ideas more effectively.
This is where a professional animation studio can help transform a basic concept into a polished visual experience.
At Prolific Studio, we approach animation as a combination of creative storytelling, visual design, and technical expertise. Whether you need an engaging explainer video, character animation, promotional content, or a custom visual experience, a carefully planned 2D animation can help communicate your message in a way that static content often cannot.
You can explore our 2D animation services to learn more about how professional 2D animation can support your brand, product, or project.
Why 2D Animation Remains Relevant
Despite the growth of 3D animation and real-time graphics, 2D animation continues to be a powerful creative medium.
One reason is its flexibility.
2D animation can be adapted to a wide range of visual styles. A project can look minimal and modern, colorful and playful, educational and informative, or highly stylized and artistic.
It can also be highly effective for digital marketing.
Brands can use animated content across websites, social media platforms, presentations, advertising campaigns, mobile applications, and educational platforms.
Another advantage is its ability to simplify complex information.
A product with complicated features can be difficult to explain using text alone. Animation can break the information into visual steps, making it easier for audiences to understand.
For example, a technology company could use 2D animation to demonstrate how its software works. A healthcare organization could explain a medical process through carefully designed visuals. An educational company could use character animation to make learning more engaging.
The possibilities are extensive.
Final Thoughts
Creating a quick 2D animation using image opacity is a simple way to understand some of the core principles behind animation production.
By preparing image assets, importing them into a workspace, adjusting opacity, building a bone structure, creating parent-child relationships, rigging the character, and adding keyframes, you can quickly transform static artwork into an animated sequence.
Opacity itself may be a relatively simple feature, but when combined with movement and timing, it becomes a valuable storytelling tool. It can help characters appear and disappear, create smooth transitions, control visual layers, and add depth to an animation.
The key to creating better animation is experimentation. Start with a simple character and a short sequence. Try different opacity values, adjust your keyframes, experiment with timing, and preview the results.
As your skills develop, you can move from simple demonstrations to more advanced character animation and motion design projects.
For businesses and brands, the same fundamentals can be expanded into professional 2D animation productions that communicate ideas, tell stories, and engage audiences.
At Prolific Studio, we understand that every animation project has a unique purpose. The right combination of storytelling, design, animation, and technical execution can turn an idea into an engaging visual experience.
Whether you are exploring 2D animation for education, marketing, entertainment, product communication, or brand storytelling, a well-crafted animation can make your message more memorable and impactful.